Every new account comes pre-loaded with a demo transaction. This is a great place to start exploring.
1. Home
The home page provides access to all your transactions as well as quick access to customer support and knowledge base articles
Open the demo transaction from the "My Transactions" list

2. Risk review
Opening a transaction takes you to the risk review, which you can think of as your due diligence document.
a. Layout
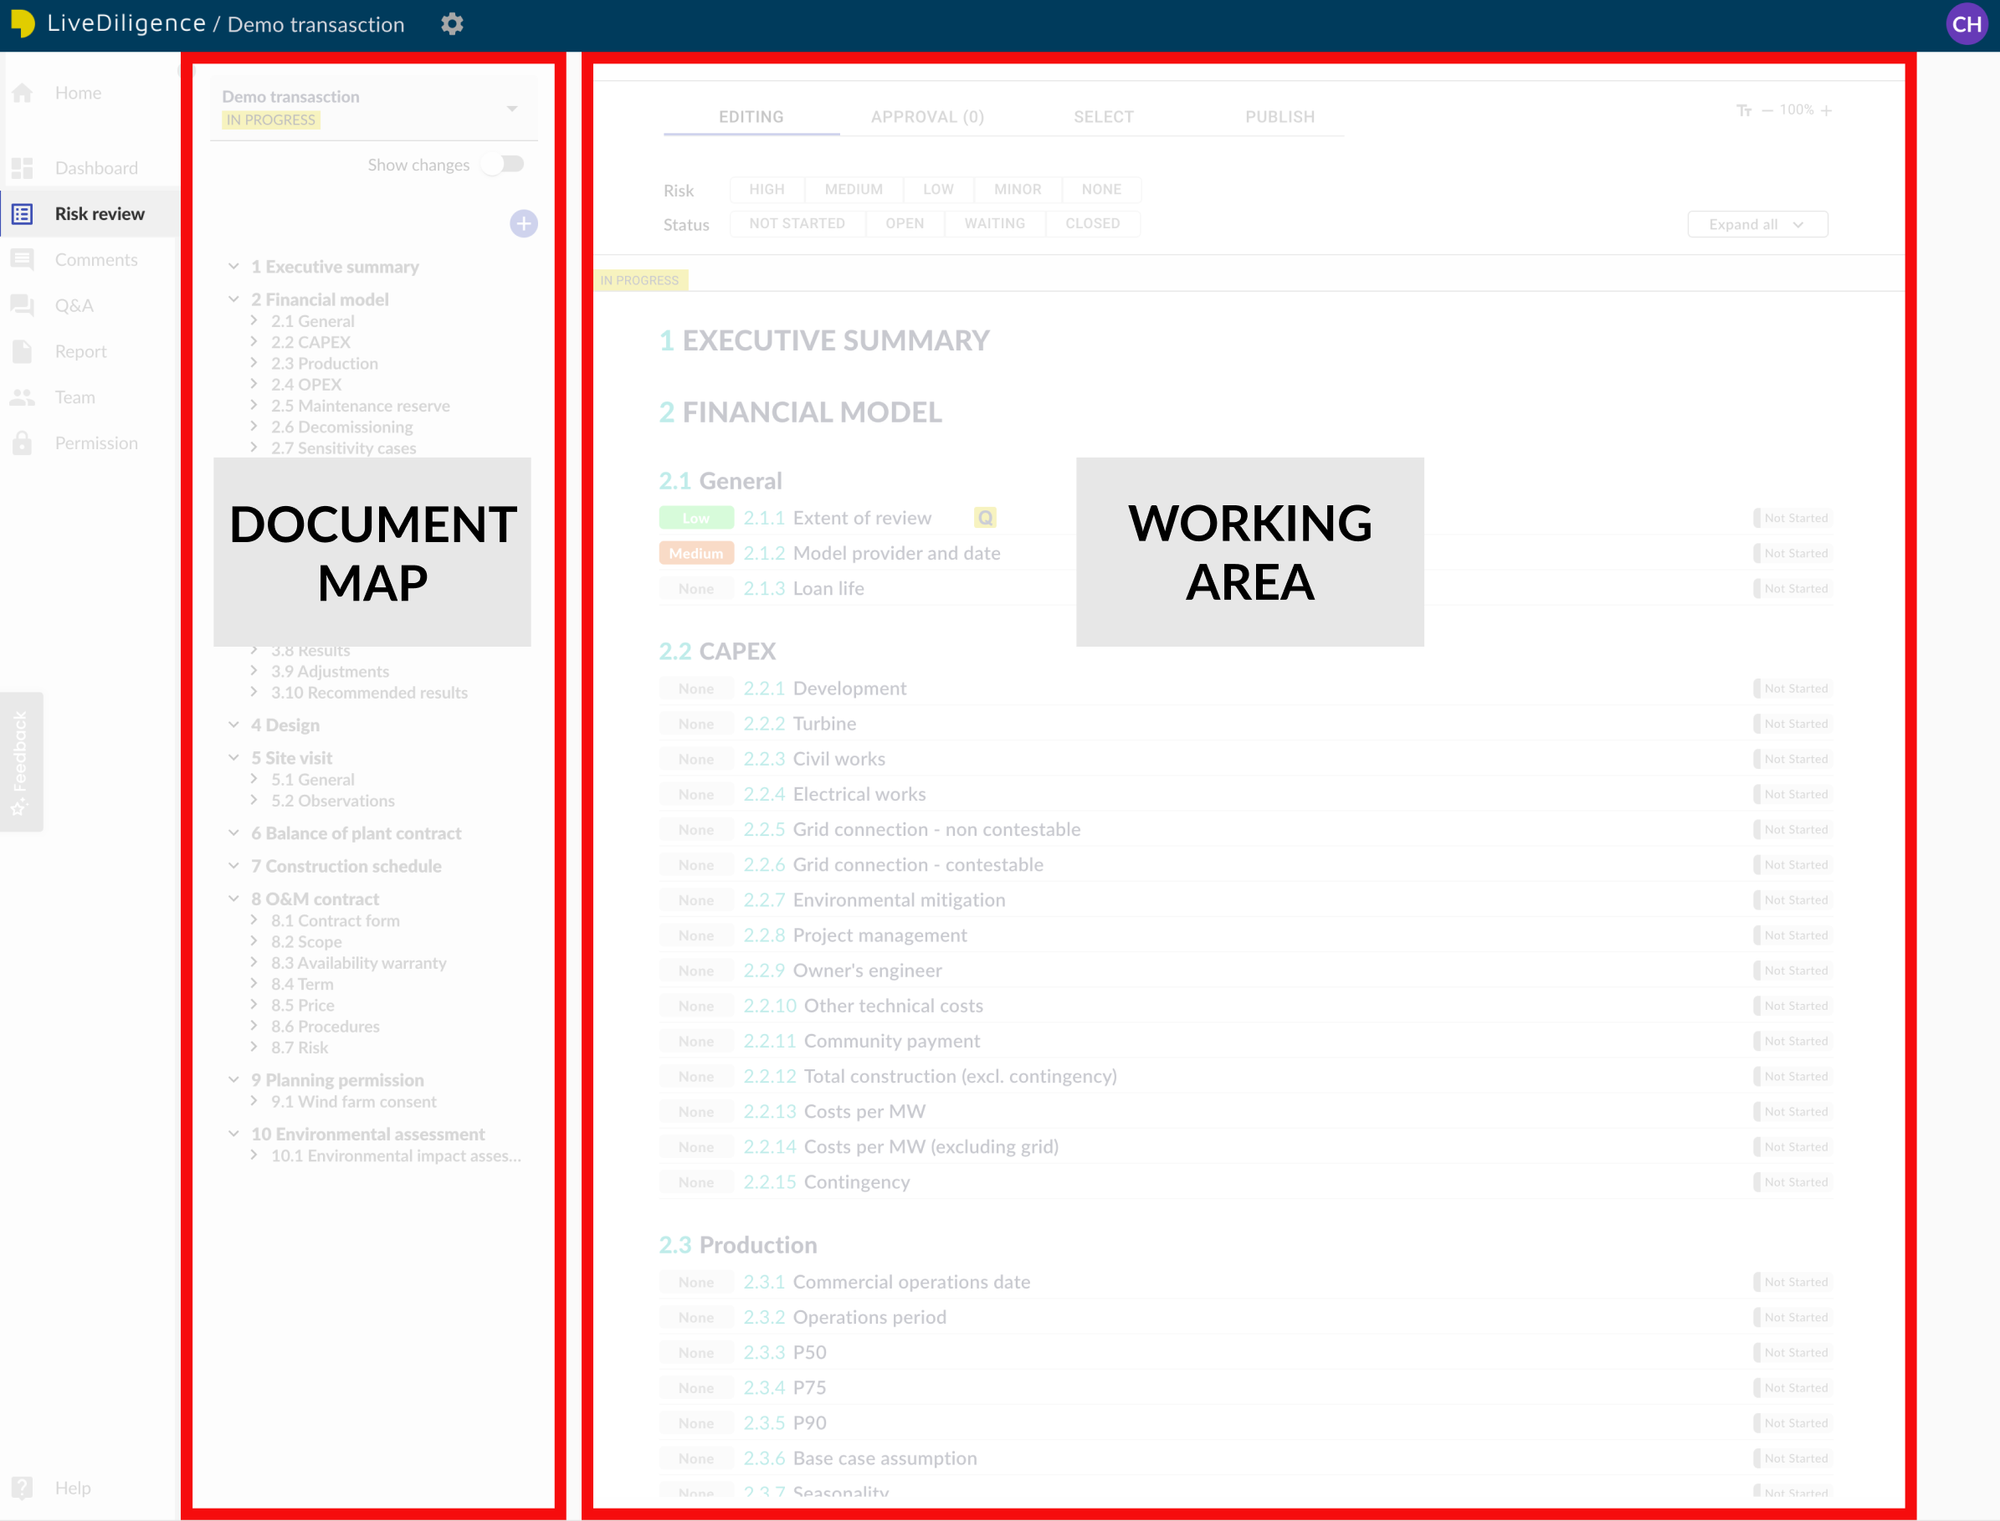
The Risk review is split into two sections :
- Document map: for navigation and editing the structure of your review.
- Working area: for adding and editing all types of content, including risk descriptions, recommendations, risk levels, comments and questions.
b. Structuring content
Content on LiveDiligence is organised into risk items and groups:
- Risk items: describe the characteristics of an individual risk
- Groups: organise risk items into topics.
An example of a group could be a Turbine Supply Agreement. An agreement like this contains several elements such as a performance warranty and defects warranty which can be captured as individual risk items.
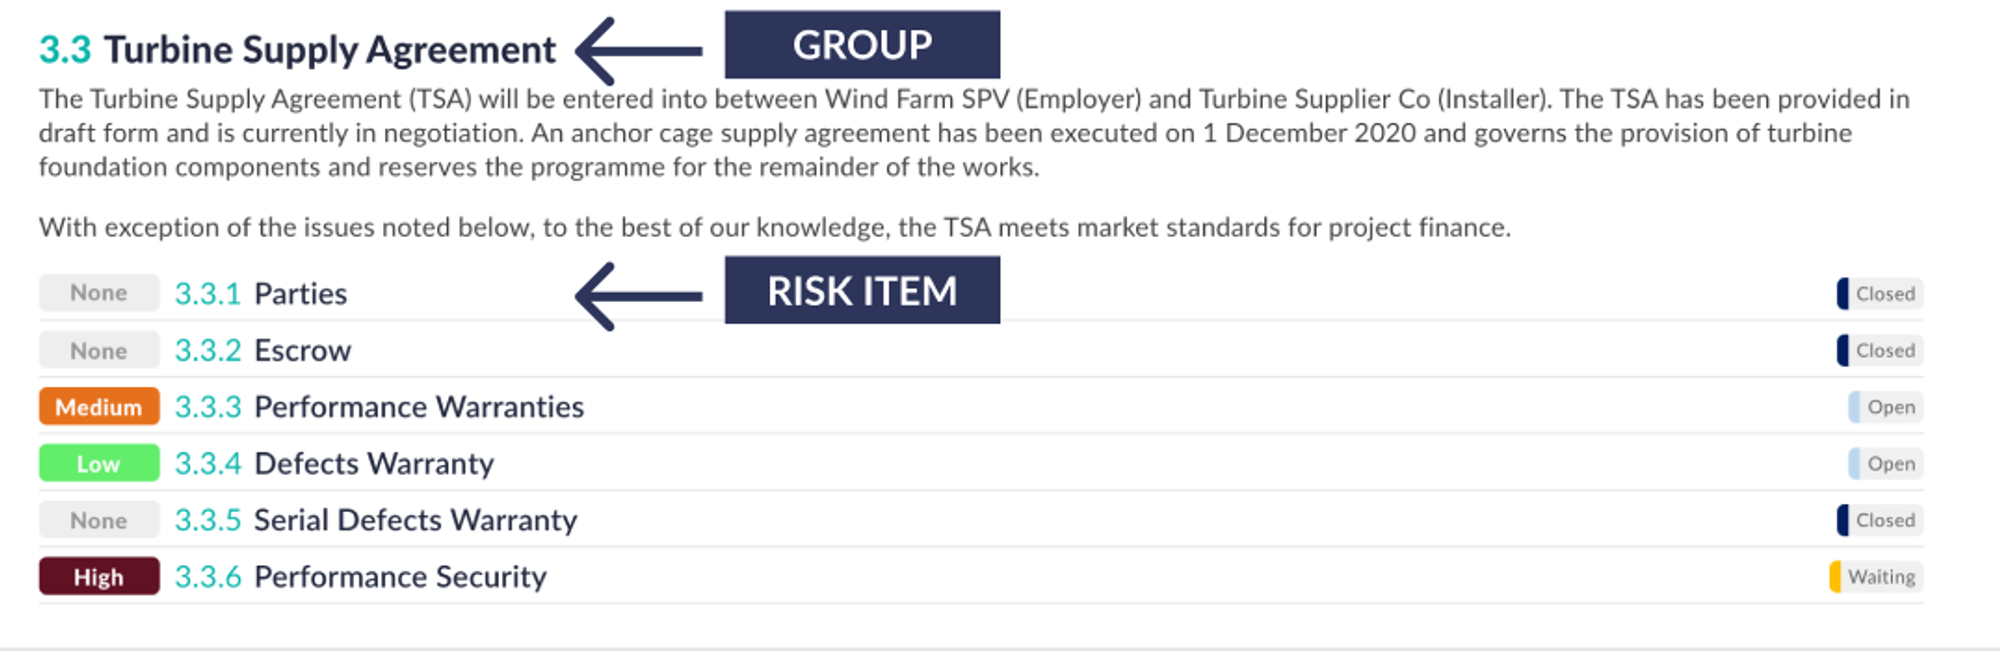
In the example above an optional summary has been added to provide further context regarding the Turbine Supply Agreement.
Summaries are a good way of capturing relevant supporting information regarding a group of risks items. Click on a group heading to add a summary.
Note that groups themselves can contain sub-groups, allowing for more complex due diligence structures to be created.
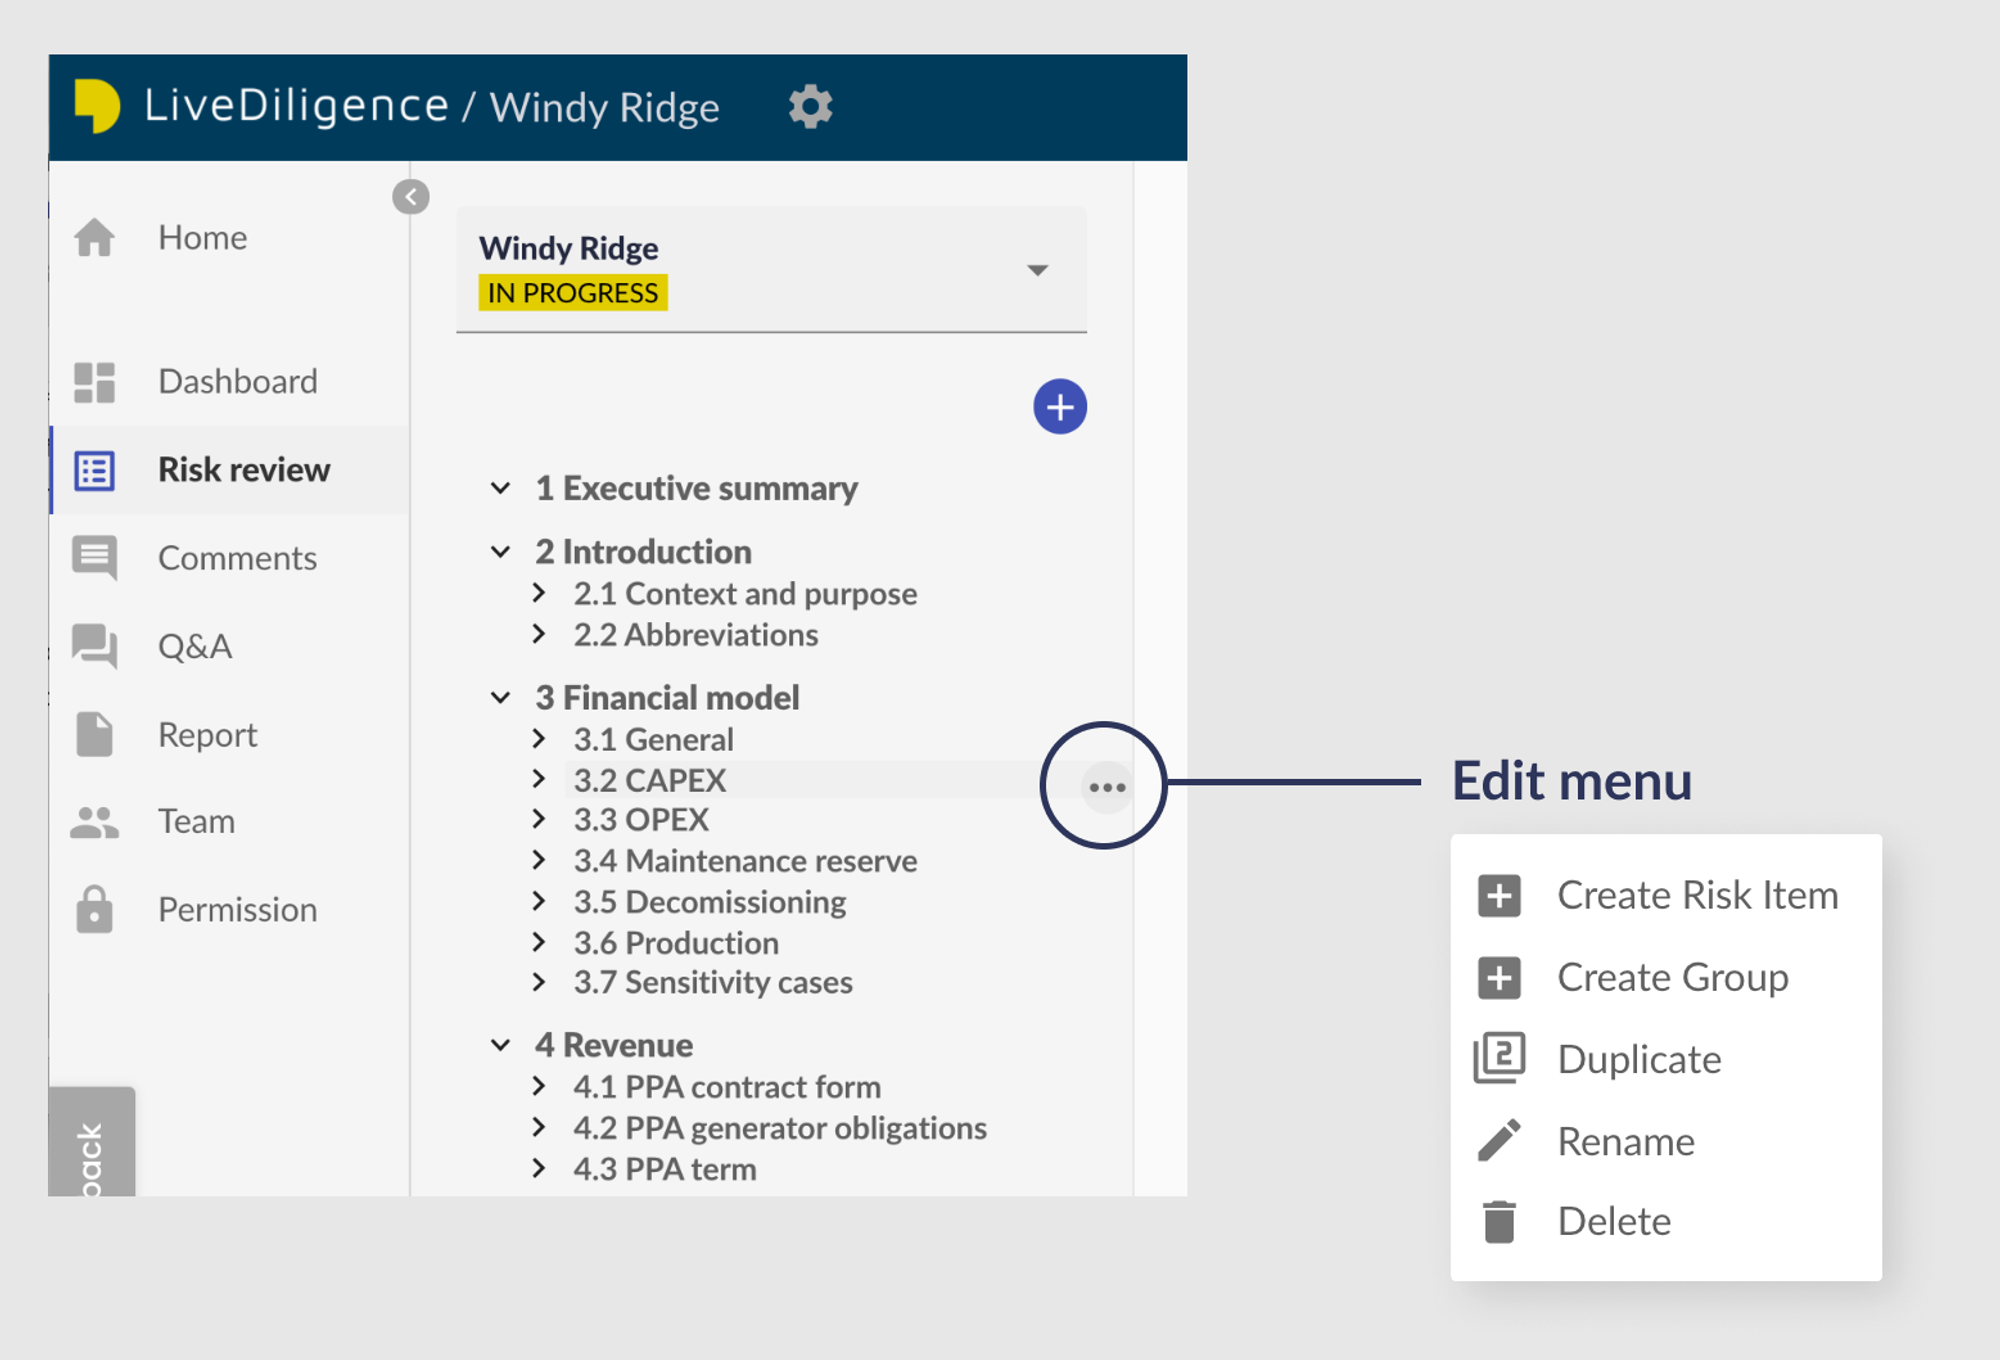
c. Editing structure
The document map can be easily edited to suit the needs of each transaction. To access the edit menu and make changes, simply hover over any item in the document map:
Things to try
- Add a summary at the top of your new group
- Rename a group
- Create a new group
- Add a risk item inside your new group
d. Risk items
Risk items are the fundamental unit of risk assessment within LiveDiligence and any discrete risk identified as part of your due diligence process should be a risk item.
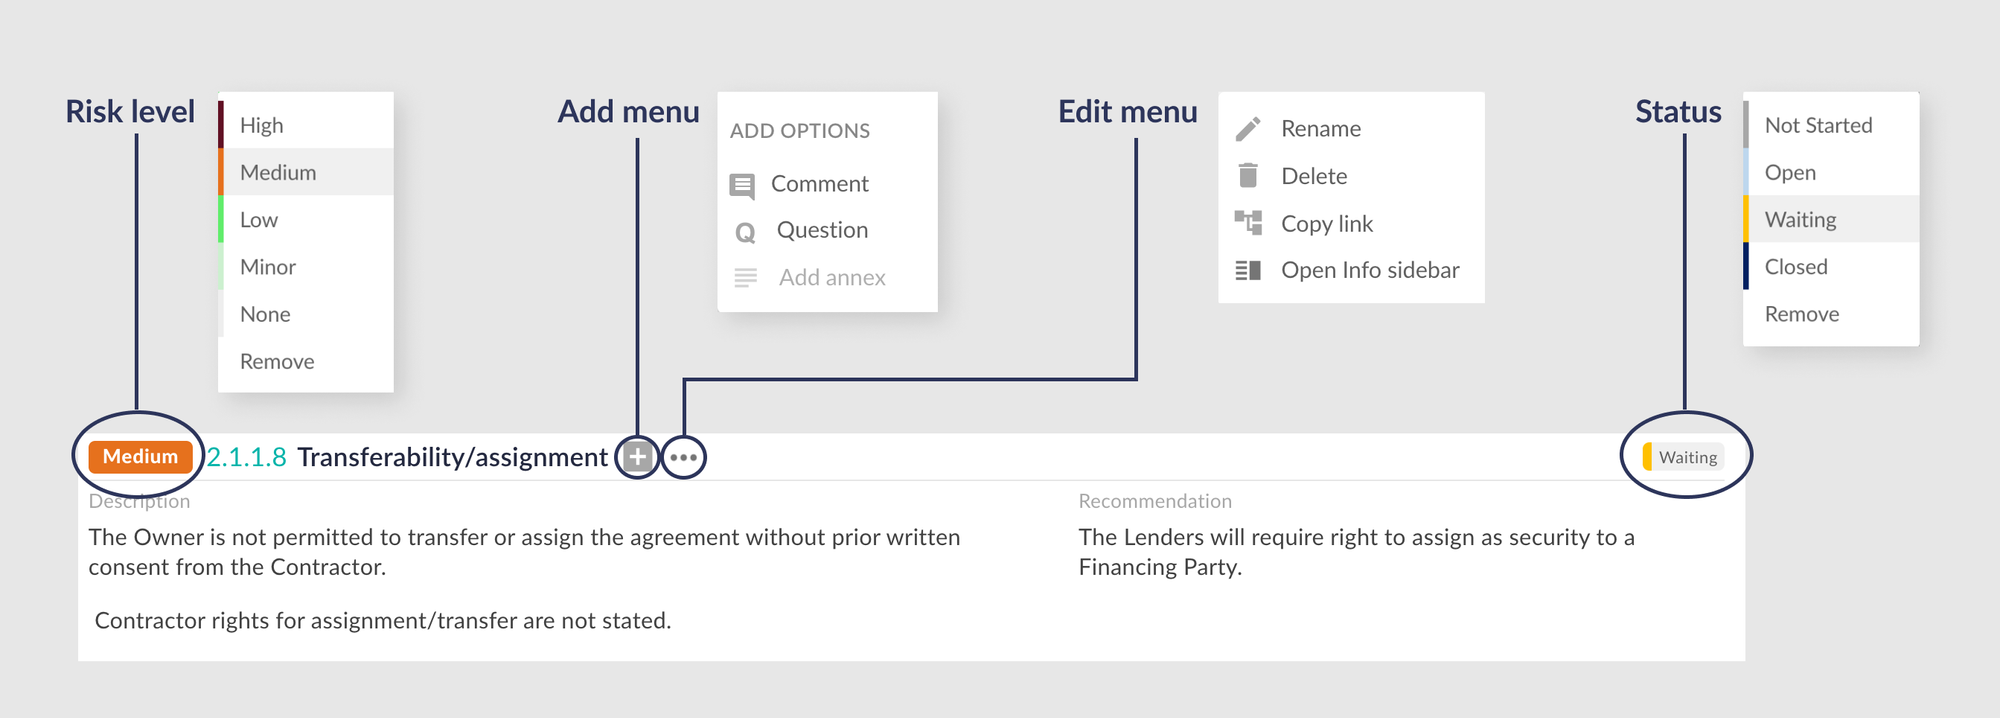
Risk items are designed to capture, in a single place, all the information needed to evaluate an individual risk. This includes the following information:
- Description: A description of the risk, including relevant context, photos, data etc.
- Recommendation: Actions or mitigating measures that may be required to reduce the likelihood or impact of a risk.
- Risk level: Risk classification (none, minor, low, medium, high).
- Status: Degree of progress assessing the risk (not started, open, waiting, closed).
- Comments: Internal and external communication related to the specific risk.
- Q&A: Formal Q&A questions raised in regard to the risk item.
Things to try
- Change a risk level
- Change a status
- Edit the description and recommendation text
- Rename a risk item
- Add a few new risk items
- Add an image
- Add a table
e. Risk and status filters
Instant filters make it easy to identify critical risks or unfinished review elements.
Select the desired risk level and status to filter the entire transaction.
The filtered risk review will comprise risk items that meet the chosen filter settings, plus parent group titles for context and any supporting information in parent group summaries.

Things to try
- Filter to find the risk items with the highest risk levels
- Filter to find all risk items waiting for input
f. Templates
Templates save you time and provide big quality assurance benefits - promoting review consistency and ensuring every key risk is covered.
Users can choose to load template risk review structures only (group and risk item headings) or template structures complete with content.

Creating a set of standard templates for individual organisations can be very powerful. Potential examples could include:
- Project or technology specific content.
- Client specific scope requests.
- Standard review approaches (red-flag, full DD, portfolio DD etc).
- Common contract forms.
As well as standard structure and content, templates can also include guidance notes, resulting in a great training tool.
Any transaction can be set as a template in transaction settings, together with desired permissions.

Things to try
- Set your demo transaction (or a new one) as a template
- Load a subset of a template transaction
3. Comments
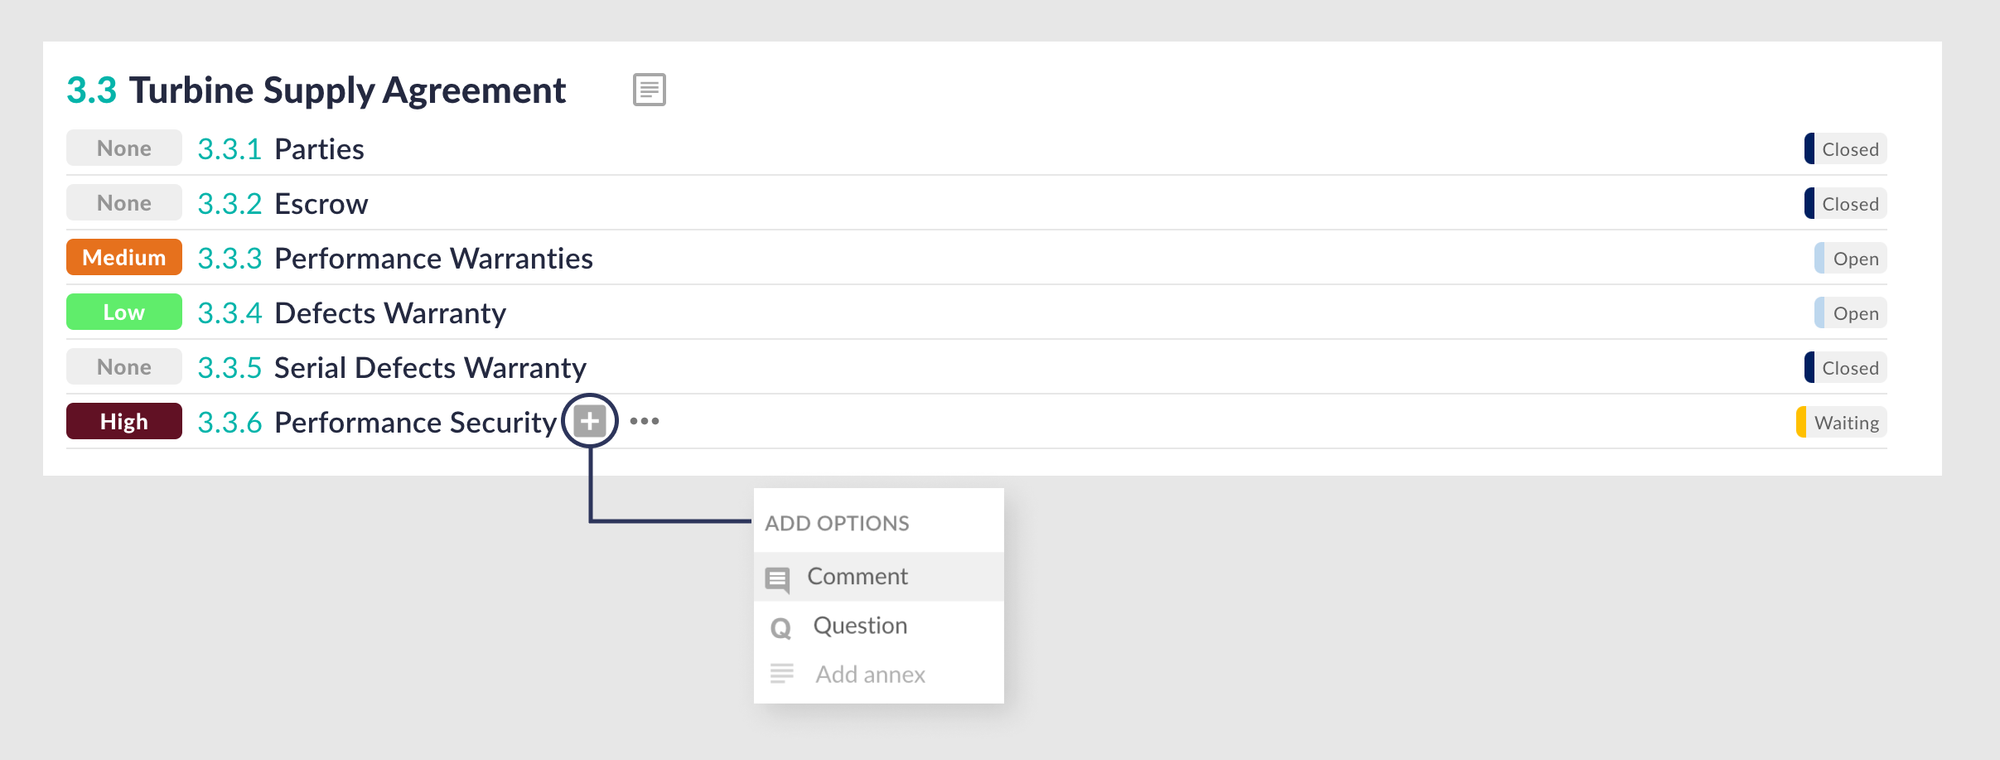
Comments can be added to any element of the working area, whether a group, or a risk item.
Comments are divided into two types:
- Editor comments: are intended for internal communication and can only be seen by advisors conducting the due diligence. Clients cannot see Editor comments.
- Client comments: can be see by both clients and advisors, providing a separate place for client facing communication.
To add a comment, open the add menu and select "comment". This will open the risk review sidebar where you can type your comment.
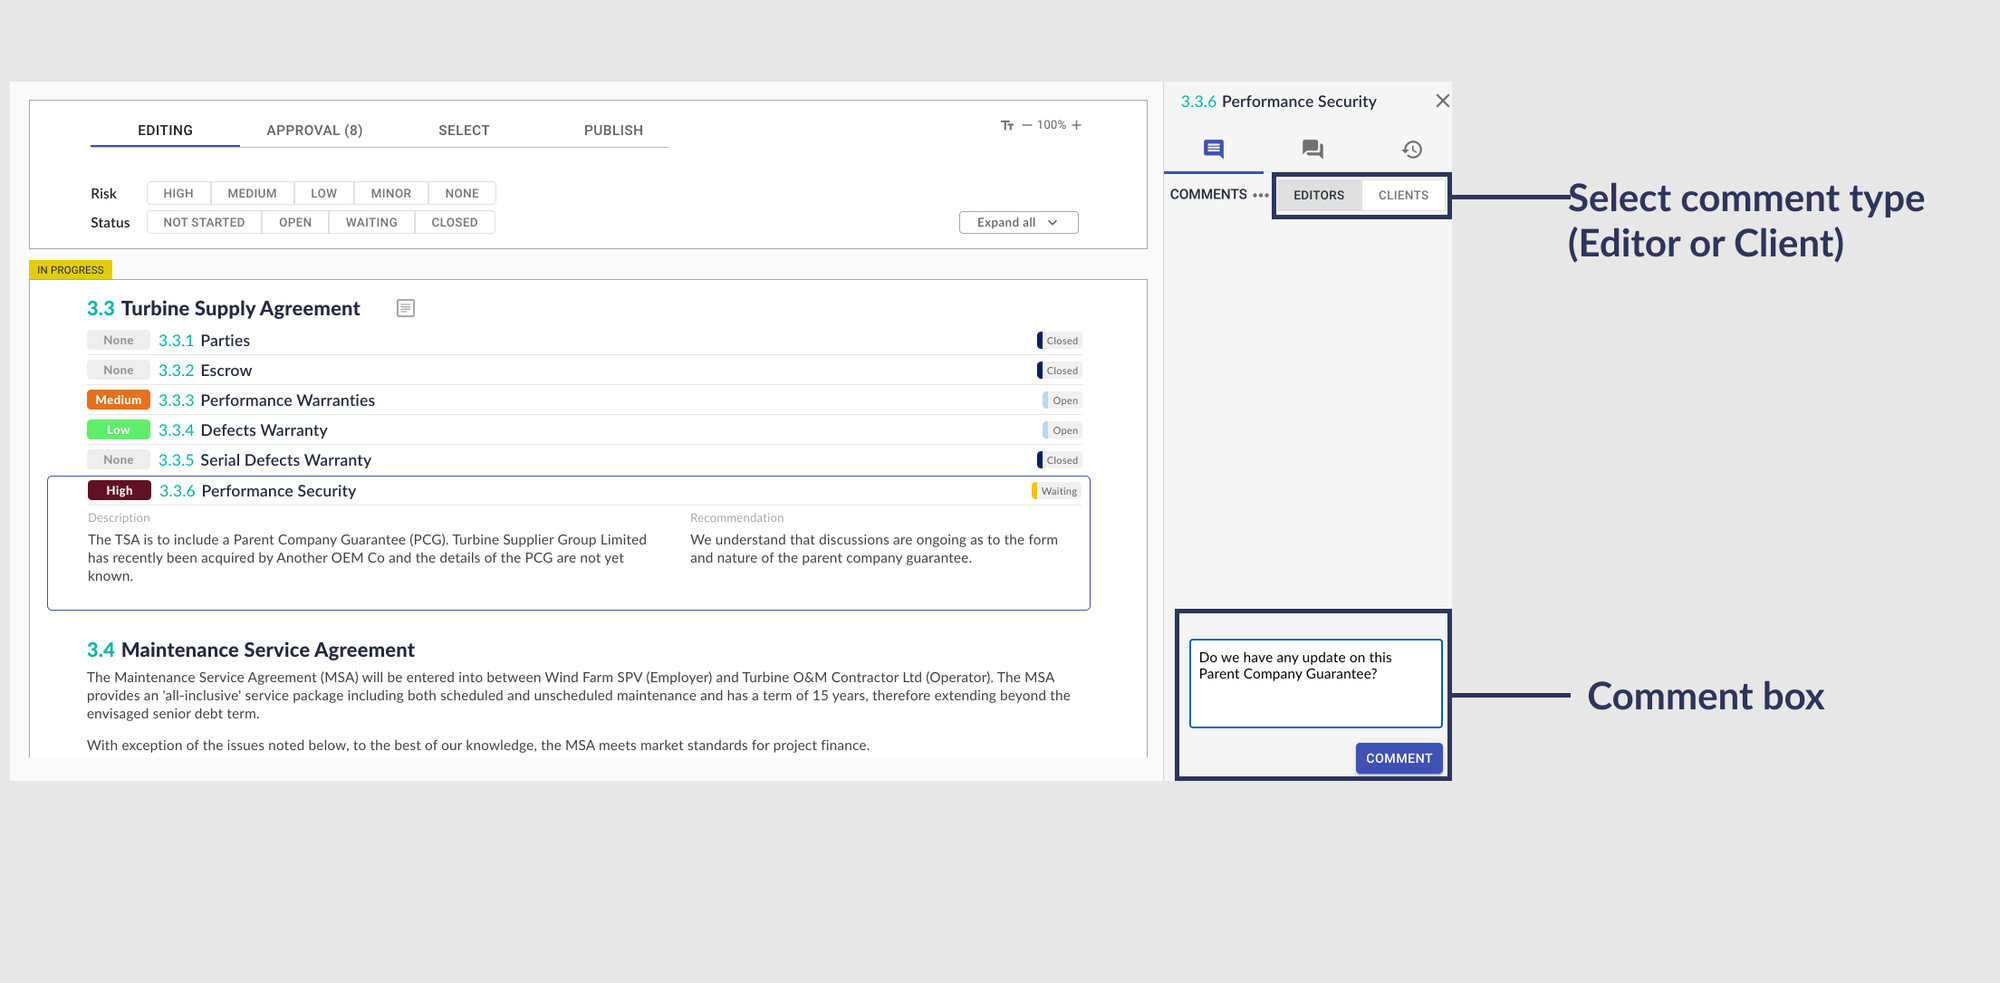
All transaction comments are automatically collated in a separate comments page for easy comments management, including export to Excel.

Things to try
- Add a new comment
- Reply to an existing comment
- @mention one of your colleagues in a comment
- Check for any unresolved client comments
- Export the collated list of comments
4. Q&A
Formal questions can be added to any element of the working area, whether a group, or a risk item.
LiveDiligence Q&A supersedes the traditional Q&A spreadsheet and replaces or compliments 3rd party data room solutions.
To add a question, open the add menu and select "Question". This will open the risk review sidebar where you can type your question.


All transaction Q&A threads are automatically collated in a separate Q&A page for easy Q&A management, including export to Excel.

Question assignment and visibility can be set by organisation and important questions flagged as high priority.
Users can be added to the transaction to respond to their questions direct, within LiveDiligence. Access can be restricted to only the Q&A if desired. See the Permission and Team guidance.
Things to try
- Ask a question
- Flag a question as high priority
- Change a question assignment and visibility
- Mark a question as closed
- Export the collated Q&A
5. Activity feed
Every risk item comes with its own activity feed, so you can trace the live evolution of each issue or go back later to verify your process. Great for audit trail purposes.
Access the activity feed from the risk review sidebar and click on the activity feed tab.


On the subject of audit trail, all comments and Q&A can be exported to Excel and all publishes exported to pdf.
6. Approval
LiveDiligence comes with built-in approval tools, helping you implement quality control on all your deliverables without breaking your work flow.
Click the “APPROVAL” tab of the approval and publish workflow. All changes pending approval are highlighted and can be approved individually (click the open circles) or all at once (click “APPROVE ALL”).
Filters let you see the full review, only changes pending approval, or only approved changes (pre-publish).

Things to try
- Approve individual changes
- Set the filter to “APPROVED” and revert approval of an approved change
- Approve all
7. Publish
Deliver due diligence insights faster with real time publishing.
Control exactly what content is delivered to your client and when, in 2 steps:
a. Select changes to publish
Click the “SELECT” tab of the approval and publish workflow. All changes pending publish are highlighted and can be selected for publish individually (click the open squares) or all at once (click “SELECT ALL”).
The approval status of all changes pending publish is identified by checked (approved) or unchecked (unapproved) circles in the document map.
Filters let you see the full review, only changes pending publish, or only changes selected for publish, making it easy to see what’s new.

Users have the opportunity at this stage to reject deletions of previously published groups or risk items.
b. Publish
Click the “PUBLISH” tab of the approval and publish workflow.
Enter a name and short description for the publish, then click “PUBLISH”. The new changes you have selected to publish will be immediately available to your client (once they are provided with appropriate transaction access).
The list of users that will have access to the publish can be checked by clicking the people icon next to the “PUBLISH” button.

All published risk reviews and the work in progress risk review can be accessed from the drop down menu above the risk review document map.
LiveDiligence tracks changes continuously - so you always have a mark-up whenever you need it. Switch on the “Show changes” toggle to compare any version of the risk review to another. All additions and deletions will be highlighted.
Select “ONLY CHANGES” to show only the review elements that have changed. Clients and advisors love this feature - no more searching through 200 page reports to find updated content.
Things to try
- Select individual changes to publish
- Set the filter to “SELECTED” to change your mind and deselect a change
- Publish some changes
- Switch on the “Show changes” toggle to compare published versions and test out the “ONLY CHANGES” view
8. Report
PDF reports can be downloaded from LiveDiligence without all of the usual frustrating formatting headaches.
Create a report in 3 steps:
a. Select content
Choose which version of the risk review (published or work in progress) to generate the report from (default is the most recent publish), then select the risk review elements to include. Use shortcut buttons to batch select or deselect content at the transaction and group levels.
Redline PDF reports can be generated by switching on the “Show changes” toggle and selecting the risk review versions to compare (any published or work in progress risk review).

b. Select custom report or build from template
Get a head start and ensure brand consistency with a template, or start fresh with a custom report format.
c. Format pages, preview & download
Custom cover page and headers and footers in the main report body can be created to reflect your organisation branding.
Edit the cover page in stages:
- Edit content: add images and text.
- Change layout: resize and move the added content.
Use the preview feature to see what your report will look like without having to download a copy.
Save your preferred report format as a template to use in the same transaction or globally within your organisation.
It can be a good idea to preview a report export before publishing as you may wish to make minor tweaks to the risk review to refine report appearance (page break locations, image sizes etc).
When you are happy, download the PDF to store or share.

Things to try
- Download a report based on the latest publish, for selected content
- Download a redline report
- Select a global report template
- Create and save a new report template
9. Team
There are 3 main LiveDiligence user types:
- Internal users: colleagues within your organisation.
- External editors: users outside your organisation who will contribute to the review (e.g. an external expert).
- External clients: users outside your organisation who will read the review but not create content (e.g. your client or their other advisors).
Invite internal users to your transaction by selecting from the list of colleagues within your organisation that already have LiveDiligence accounts, and assigning a transaction role.
Invite external users to your transaction by selecting user type (external editor or external client), entering their emails, and assigning a transaction role.
The Permission guidance explains how to create transaction roles, which should be completed before adding users to your transaction.

Internal users new to LiveDiligence can be invited to your LiveDiligence organisation from the user administration part of your organisation settings, accessed from your profile.
10. Permission
LiveDiligence uses a role based permissions system for easy and secure user management.
On the Permission page, create additional custom roles within the 3 main user types (described in the Team guidance) by clicking on the relevant “+” symbol.
Role specific transaction access and permissions can be selected:
- Risk review access and permissions: Control who can see and edit what, by selecting from the options of Hidden, Read, and Read & write, for all risk review elements. Fine control is possible, with option to set permissions at individual group and risk item level.
- Feature access and permissions: Toggle on and off access to the core platform functionality. There is some in-built feature limitation reflecting chosen user type.
Clicking “SAVE” will instantly implement your chosen settings for all users belonging to the amended role.

Individual users can be assigned to transaction roles as soon as the roles are created (described in the Team guidance).
The LiveDiligence permission system makes it easy to control and update access to your transaction as it evolves. Examples of application for different potential transaction users include:
- A specialist subcontractor or team member that requires access only to the risk review sections related to their specialism, and no client facing or project management functionality.
- A seller or borrower that only needs to respond to Q&A, with no access to the risk review.
- A client that needs access to the published risk reviews, Q&A and comments.
Things to try
- In Permission - create a new internal role
- In Team - assign a colleague to the new internal role
- In Permission - working with your colleague, experiment by changing their access and permission settings